在线查看器
参考教程
项目代码
Chapter 1:Output an image
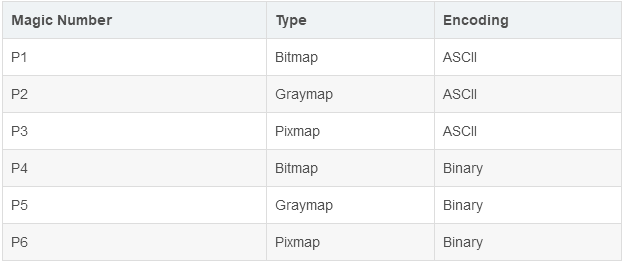
1.1 PPM图像
P3 3 2 255 255 0 0 0 255 0 0 0 255 255 255 0 255 255 255 0 0 0
Chapter 2:The vec3 class
2.1 向量类,见vec3.h
Chapter 3:Rays,a
simple camera, and background
3.1 光线,见ray.h
\[
p(t) = origin + t * direction
\]
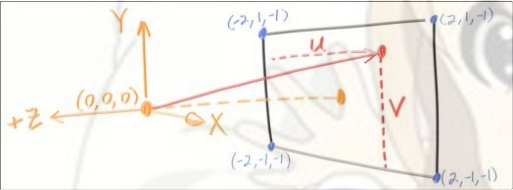
3.2 相机,见camera.h
主要任务是,给定一个\([0,1]^2\) 的屏幕坐标,生成一条光线
ray camera::getRay (double u, double v) { ray r (position, low_left_corner + u * horizontal + v * vertical - position) ; return r; }
在外层需要遍历图像中的每一个像素点,计算其对应的\((u,v)\) 坐标
for (int j = Image_Height - 1 ; j >= 0 ; j--) { std::cerr << "\r" << "Scanlines remaining: " << j << ' ' << std::flush; for (int i = 0 ; i < Image_Width; i++) { auto u = double (i) / Image_Width; auto v = double (j) / Image_Height; ray r = main_camera.getRay (u, v); color pixel = world.ray_color (r); pixel.write_color (std::cout); } }
3.3 background
使用基于方向的颜色插值方法
color ray_color (const ray& r) { vec3 direction_unit = r.getDirection ().normalize (); double t = 0.5 * (direction_unit.y () + 1 ); return (1 - t) * color (1.0f ) + t * background; }
Chapter 4:Adding a sphere
4.1 球,见sphere.h
向场景中添加了一个球,此时摄像机发出的光线就会与球产生碰撞 \[
(P-center)·(P-center) = radius^2 \\
P=origin + t*direction
\] 联立求解\(t\) ,得: \[
direction^2*t^2 +
2*direction*(origin-center)*t+(origin-center)^2-radius^2=0
\] 根据求根公式,即可求解碰撞点
bool sphere::hit (const ray& r, double t_min, double t_max, hit_record& record) const vec3 oc = r.getOrigin () - center; auto a = dot (r.getDirection (), r.getDirection ()); auto b = 2.0 * dot (oc, r.getDirection ()); auto c = dot (oc, oc) - radius * radius; auto discrimination = b * b - 4 * a * c; if (discrimination < 0 ) return false ; auto sqrtd = sqrt (discrimination); auto t = (-b - sqrtd) / (2 * a); if (t < t_min || t > t_max) { t = (-b + sqrtd) / (2 * a); if (t < t_min || t > t_max) return false ; } record.t = t; record.position = r.at (t); vec3 outward_normal = (record.position - center) / radius; record.set_face_normal (r, outward_normal); return true ; }
Chapter
5:Surface normals and multiple objects
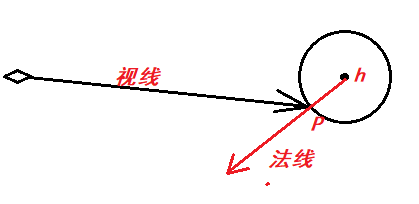
5.1 表面法线
碰撞点为\(p\) ,球心为\(h\) ,那么表面法线即为:\(h→p\)
5.2
与多物体碰撞,见hittable_list.h
就是遍历场景中的每个物体,将光线与物体求交
过程中要注意更改t_min, t_max
结果记录在hit_record中
bool hittable_list::hit (const ray& r, double t_min, double t_max, hit_record& record) const hit_record temp_rec; bool hit_anything = false ; double closest_so_far = t_max; for (const auto & object : objects) { if (object->hit (r, t_min, closest_so_far, temp_rec)) { hit_anything = true ; closest_so_far = temp_rec.t; record = temp_rec; } } return hit_anything; }
Chapter 6:Antialising
此处是通过超采样,实现抗锯齿效果
每个像素发射50根光线,将得到的结果平均,作为最后的颜色
最后加上一个gamma 2矫正,让场景更亮一点
for (int j = Image_Height - 1 ; j >= 0 ; j--) { std::cerr << "\r" << "Scanlines remaining: " << j << ' ' << std::flush; for (int i = 0 ; i < Image_Width; i++) { color pixel; for (int cnt = 0 ; cnt < samples_per_pixel; cnt++) { auto u = double (i + Random::random_double_01 ()) / Image_Width; auto v = double (j + Random::random_double_01 ()) / Image_Height; ray r = main_camera.getRay (u, v); pixel += world.ray_color (r); } pixel /= samples_per_pixel; pixel.gamma2 (); pixel.write_color (std::cout); } }
Chapter 7:Diffuse Materials
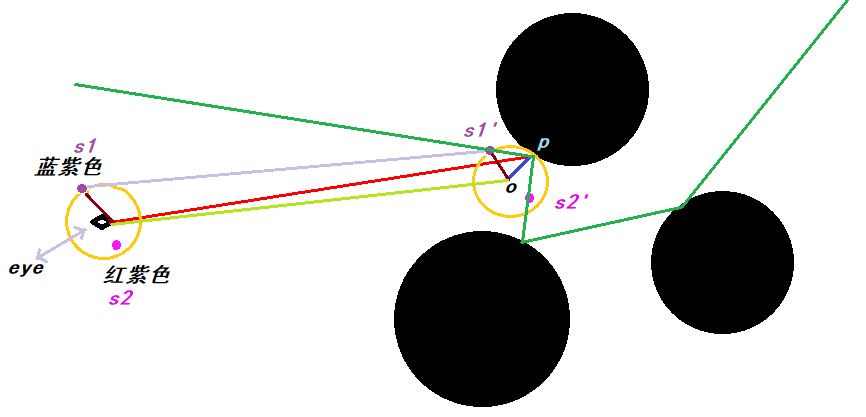
光线与表面碰撞,相交于点p
在与p相切的单位圆内,随机找一点s,散射光的方向即为p => s
每次散射,均会让光线强度减半
color hittable_list::ray_color (const ray& r, int depth) { if (depth >= 50 ) return color (0.01f ); hit_record rec; if (this ->hit (r, 0 , INFINITY, rec)) { vec3 target = rec.position + rec.normal + Random::random_unit_sphere (); ray new_r = ray (rec.position, target - rec.position); return 0.5 * ray_color (new_r, weight / 2 ); } else { vec3 direction_unit = r.getDirection ().normalize (); double t = 0.5 * (direction_unit.y () + 1 ); return (1 - t) * color (1.0f ) + t * background; } }
diffuse表面:
视线与物体表面产生撞击点p,在p处相切单位圆内随机找一点s,散射光方向即p->s
采用的光线强度衰减机制是取半
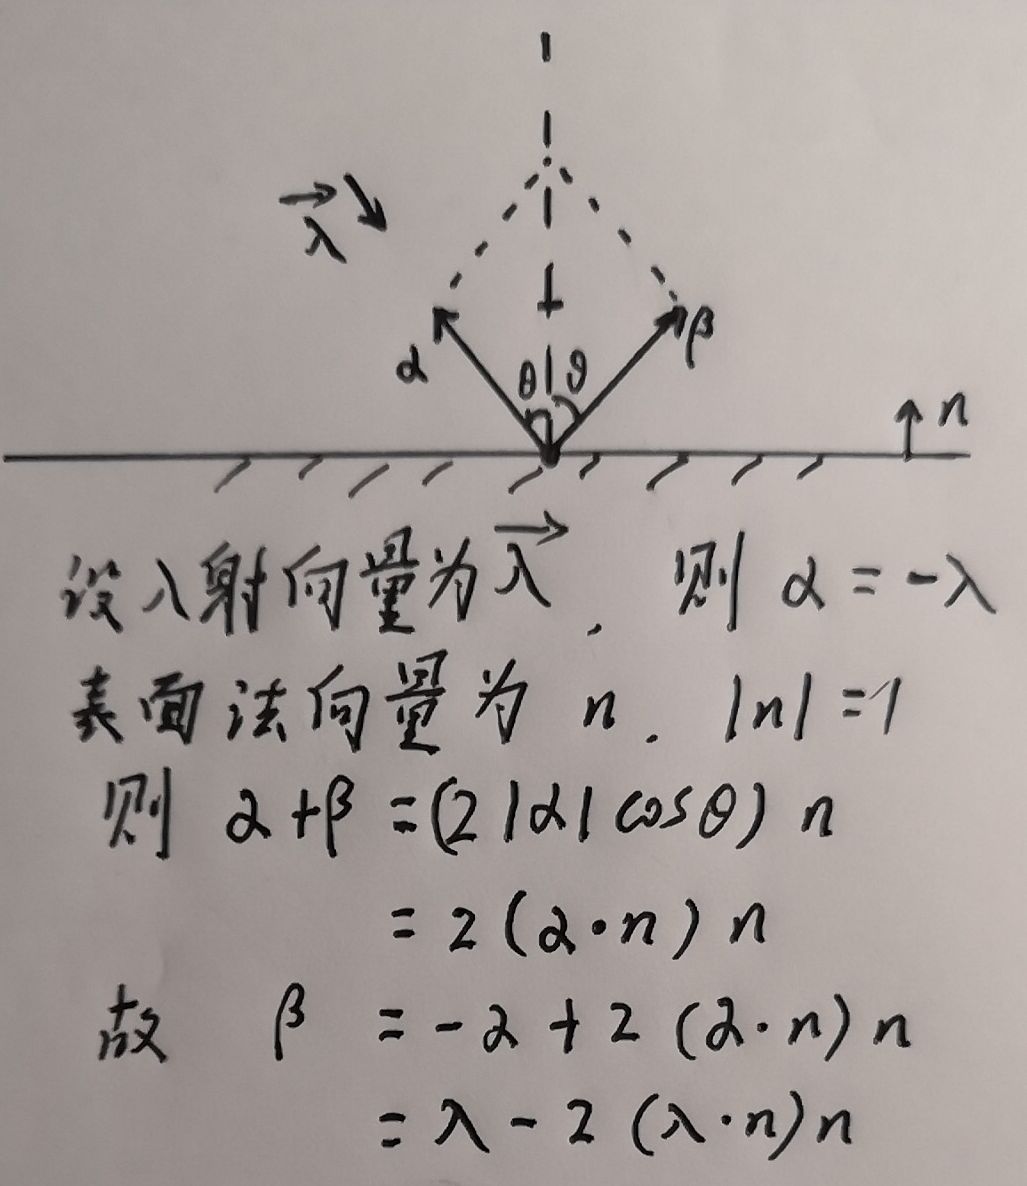
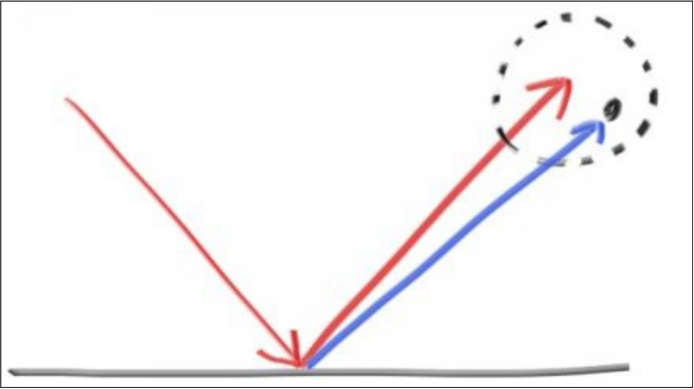
metal表面:
根据物理反射定律确定入射光对应的反射光的方向
强度衰减改为三元组,分别对应rgb三分量的衰减度,且用参数自由确定
8.1 材质类,见material.h
class material {public : virtual bool scatter (const ray& r_in, const hit_record& record, color& attenuation, ray& r_out) const 0 ; };
8.2 金属材质的反射
bool material_metal::scatter (const ray& r_in, const hit_record& record, color& attenuation, ray& r_out) const vec3 target = reflect (r_in.getDirection ().normalize (), record.normal); r_out = ray (record.position, target); attenuation = albedo; return dot (r_out.getDirection (), record.normal) != 0 ; } inline vec3 material_metal::reflect (const vec3& in, const vec3& normal) const return in - 2 * dot (in, normal) * normal; }
8.3 模糊镜面反射
模糊镜面反射 = 镜面反射 + 模糊系数 * 单位球随机点漫反射
bool material_metal::scatter (const ray& r_in, const hit_record& record, color& attenuation, ray& r_out) const vec3 target = reflect (r_in.getDirection ().normalize (), record.normal); r_out = ray (record.position, target + fuzz * Random::random_unit_sphere ()); attenuation = albedo; return dot (r_out.getDirection (), record.normal) != 0 ; }
Chapter 9:Dielectrics
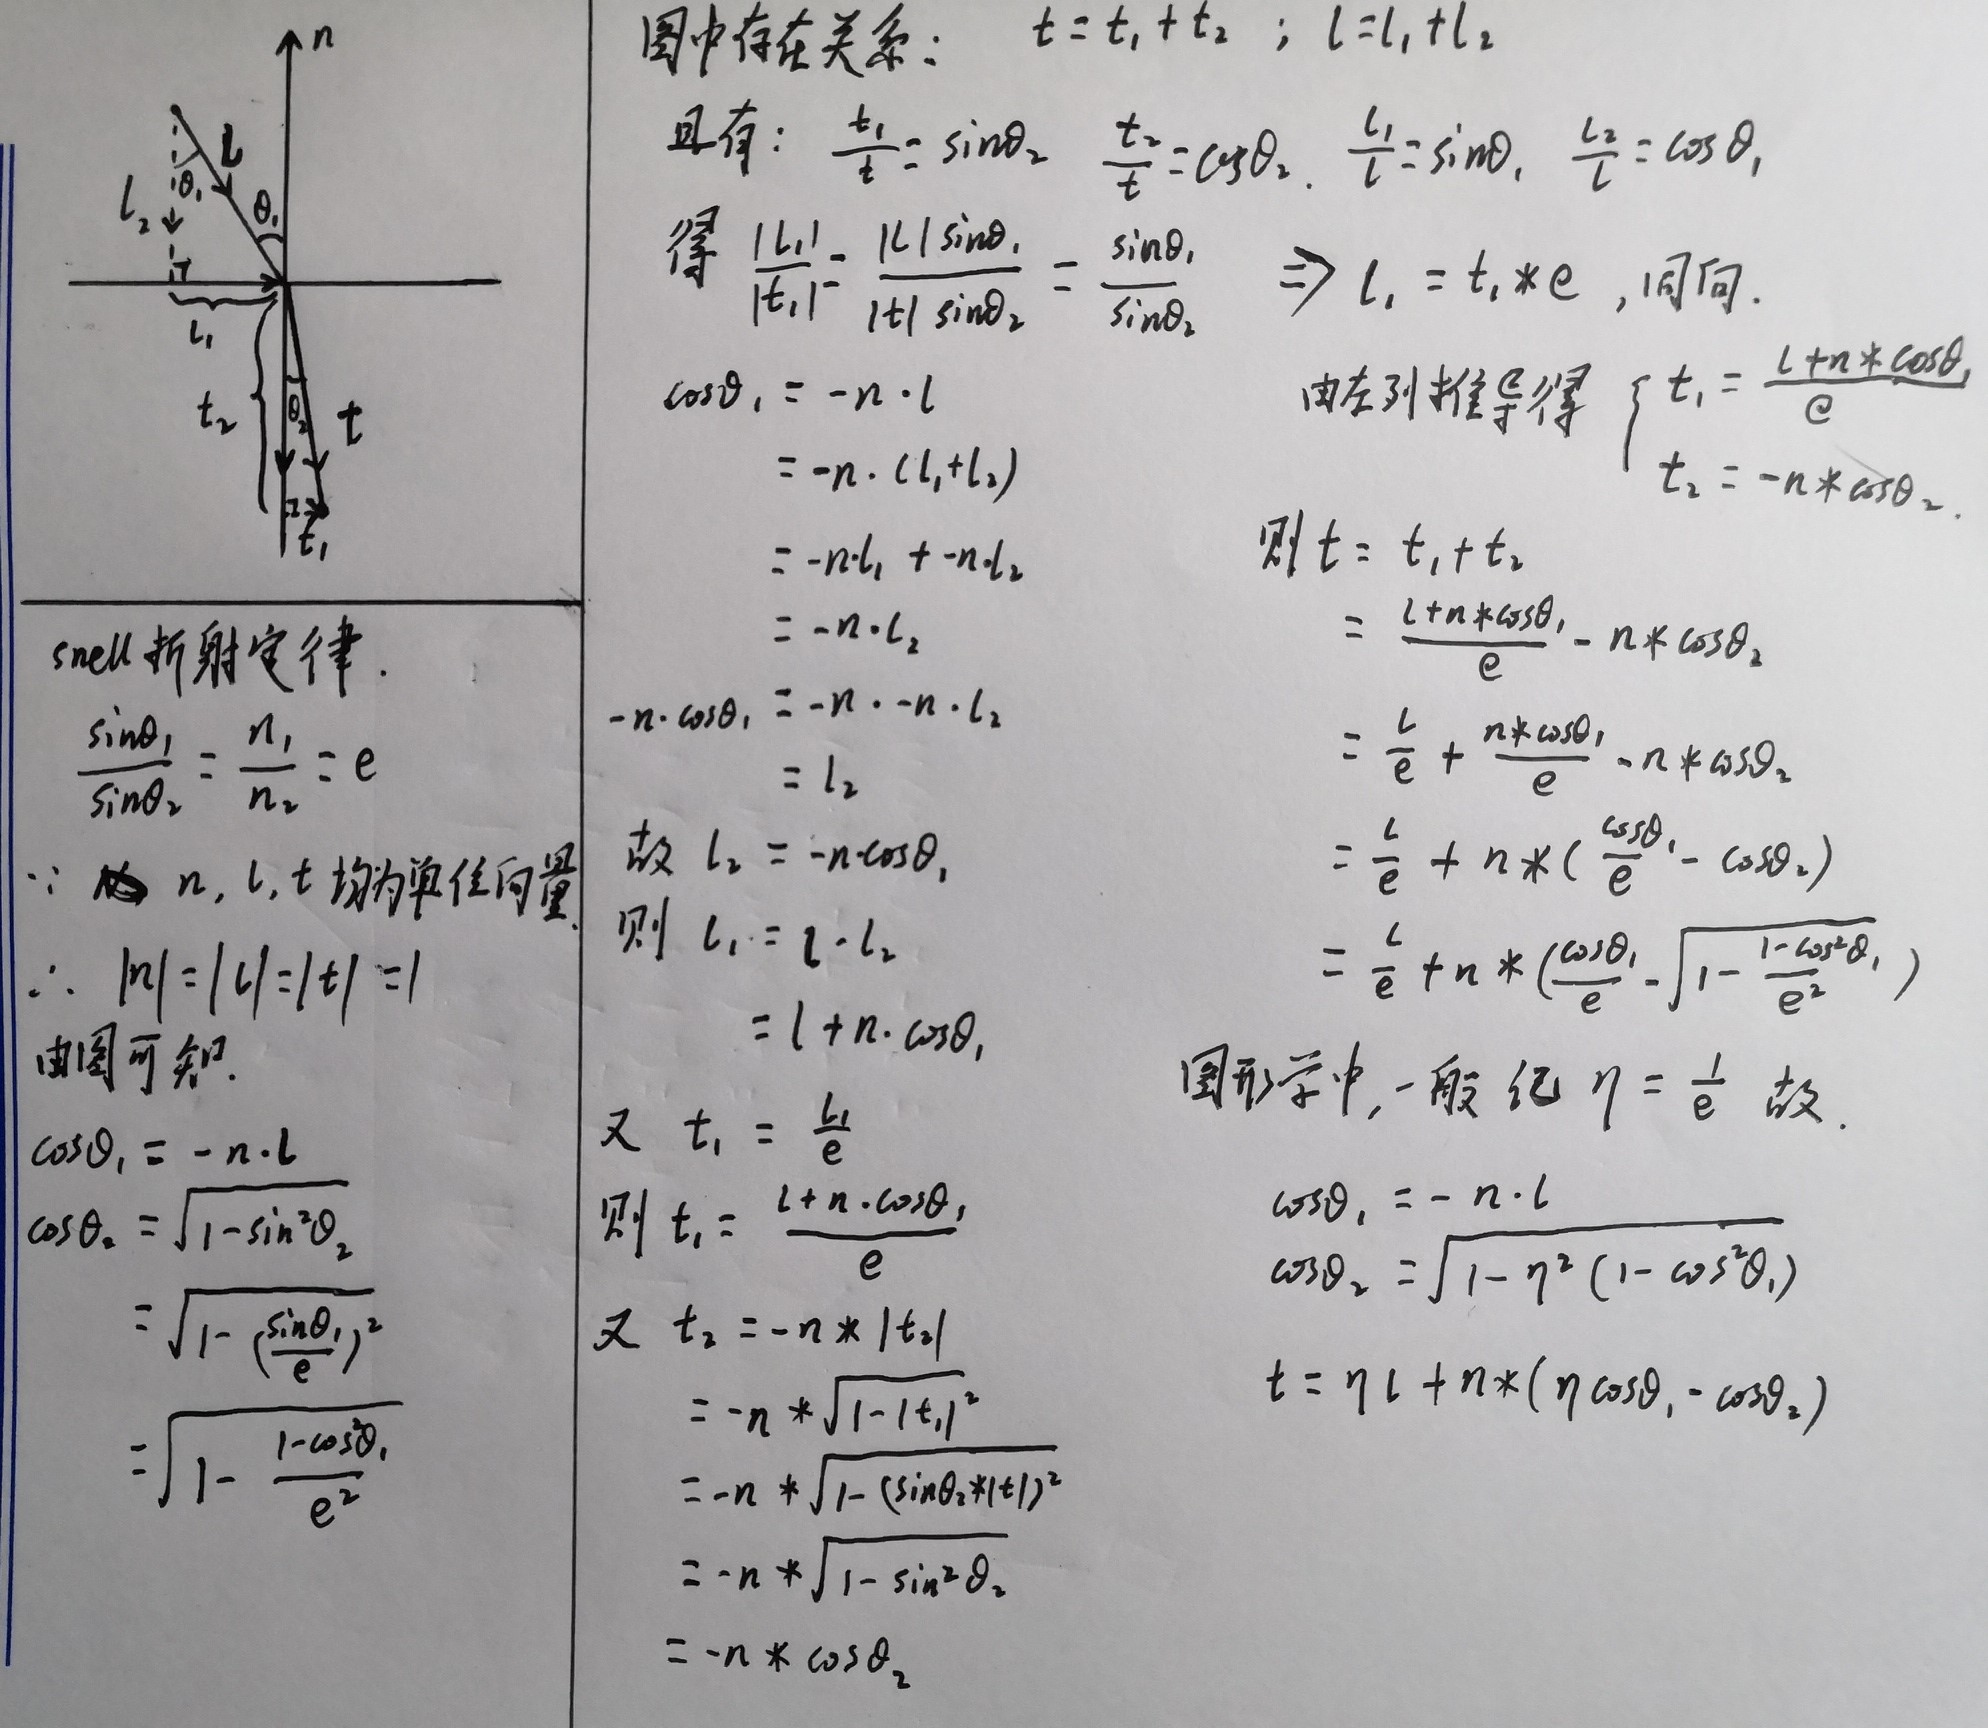
9.1 光的折射
\[
η=\frac{n_2}{n_1}
\]
当\(1-η^2(1-\cos^2
θ_1)<0\) 的时候,发生全反射现象,对应的\(\cos θ_2=0\)
9.2 电介质材质
material_dielectric
当没有发生全反射时:有一定概率反射,一定概率折射
当发生全反射时:只会反射
bool material_dielectric::scatter (const ray& r_in, const hit_record& record, color& attenuation, ray& r_out) const double eta; double reflect_prob; double cos_in; vec3 outward_normal; vec3 refracted; vec3 reflected; reflected = reflect (r_in.getDirection (), record.normal); attenuation = vec3 (1 , 1 , 1 ); if (dot (r_in.getDirection (), record.normal) > 0 ) { outward_normal = -record.normal; eta = refractive_index; cos_in = refractive_index * dot (r_in.getDirection (), record.normal) / r_in.getDirection ().length (); } else { outward_normal = record.normal; eta = 1.0 / refractive_index; cos_in = -dot (r_in.getDirection (), record.normal) / r_in.getDirection ().length (); } if (refract (r_in.getDirection (), outward_normal, eta, refracted)) reflect_prob = schlick (cos_in, refractive_index); else reflect_prob = 1.0 ; if (Random::random_double_01 () < reflect_prob) r_out = ray (record.position, reflected); else r_out = ray (record.position, refracted); return true ; }
inline double material_dielectric::schlick (const double cosine, const double refractive_index) const double r0 = (1 - refractive_index) / (1 + refractive_index); r0 *= r0; return r0 + (1 - r0) * pow ((1 - cosine), 5 ); }
Chapter 10:Positionalble
camera
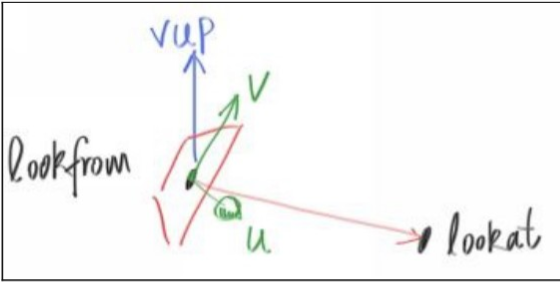
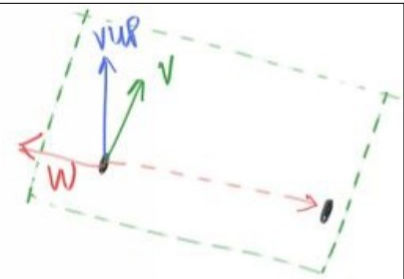
10.1 相机的参数定义
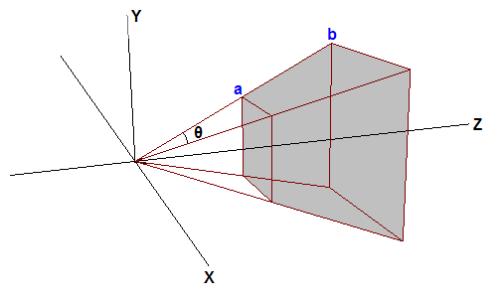
fov:field of view
vfov:相机在垂直方向上从屏幕顶端扫描到底部所岔开的视角角度hfov:相机在水平方向上从屏幕左端扫描到右端所岔开的视角角度 aspect:屏幕宽高比
\[
\tan (\frac{vfoc}{2})=\frac{Height/2}{dis}
\]
可得:
屏幕左、右边界:\(x_{left}=-\frac{Width}{2},x_{right}=-x_{left}\)
屏幕上、下边界:\(y_{up}=dis*\tan(\frac{vfov}{2}),
y_{bottom}=-y_{up}\)
10.2
相机类的实现,见camera.h
#pragma once #include "vec3.h" #include "ray.h" class camera {public : camera (double vfov, double aspect, vec3 lookfrom = vec3 (0 , 0 , 0 ), vec3 lookat = vec3 (0 , 0 , -1 ), vec3 vup = vec3 (0 , 1 , 0 )) : position (lookfrom) { double theta = vfov * std::_Pi / 180 ; double half_height = tan (theta / 2 ); double half_width = aspect * half_height; vec3 w = (lookfrom - lookat).normalize (); vec3 u = cross (vup, w).normalize (); vec3 v = cross (w, u); low_left_corner = position - half_width * u - half_height * v - w; horizontal = 2 * half_width * u; vertical = 2 * half_height * v; } inline ray getRay (double u, double v) const ray r (position, low_left_corner + u * horizontal + v * vertical - position) ; return r; } public : inline const vec3& getPosition () const return position; } inline void setPosition (const vec3& position) this ->position = position; } inline const point3& getLowLeftCorner () const return low_left_corner; } inline const vec3& getHorizontal () const return horizontal; } inline const vec3& getVertical () const return vertical; } private : vec3 position; point3 low_left_corner; vec3 horizontal; vec3 vertical; };
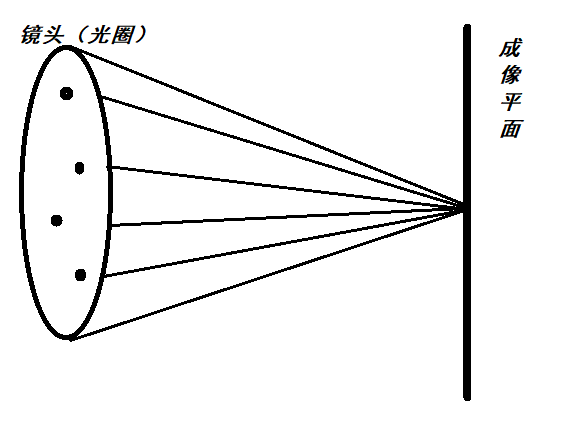
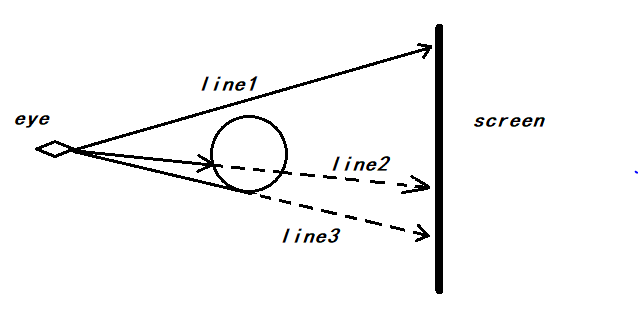
Chapter 11:Defocus Blur
11.1 散焦模糊(景深)
相机不再是一个点,而是眼睛所在的周围圆盘上的随机点
原来的dis也不再是常量,而是参数focus
成像平面变为了:z = -focus * w平面
11.2 对相机类的修改
camera (vec3 lookfrom, vec3 lookat, vec3 vup, double vfov, double aspect, double aperture, double focus) : position (lookfrom), lens_radius (aperture/2 ) { double theta = vfov * std::_Pi / 180 ; double half_height = tan (theta / 2 ) * focus; double half_width = aspect * half_height; w = (lookfrom - lookat).normalize (); u = cross (vup, w).normalize (); v = cross (w, u).normalize (); low_left_corner = position - half_width * u - half_height * v - focus * w; horizontal = 2 * half_width * u; vertical = 2 * half_height * v; }